Easy Garlic Buns Recipe with whole wheat flour that gives soft n delicious buns flavoured with garlic and herbs,
Served with mayonnaise or any other dip, they taste heavenly and are good for evening snacks or as great party starters too.
Unlike PIZZA ROLLS, these are stuffed with garlic butter and some herbs only.
Garlic Bread Vs Garlic Rolls
Garlic Bread and Garlic Rolls are the two sides of the same coin. Dough, for both, is the same, it's the shaping up that gives them different names. But I have made slight differences in the two recipes so that they stand apart.
In my garlic bread, I have used all-purpose flour and cheese as well. But these Garlic Rolls recipe is purely healthy with whole wheat and little semolina. You can try with 100% whole wheat also. But semolina gives a better texture. The choice is yours!
However, if you have a sweet tooth, then do try PEACH CINNAMON ROLLS.
You can also try these sweet loaves of bread made with orange marmalade and Nutella: ORANGE BABKA BREAD or CHOCOLATE BRAIDED BREAD
Why You Will Love This Recipe
- Perfect party starter
- A healthy evening snack
- Can be made ahead of time
- Easy to make
How To Make
Garlic rolls are made with Pizza dough only. You can make pizza dough using either refined flour or whole wheat flour or a mix of both.
Here, I have taken whole wheat flour and have added little semolina to it. For making pizza dough, again I used instant yeast. Instant yeast can be added directly to the flour and thus I mixed it in the flour only. But do so, only if you are sure that your yeast is good and is not lying in your pantry for long.
If unsure about your yeast, then I would suggest that you prove it in water first. If it gets frothy and bubbly then this will be an assurance that your garlic rolls too would come out good. To proof it in water, you may refer to my post of GARLIC BREAD.
Once the pizza dough is ready, you can use it for making any type of bread or pizza. Other than Garlic Rolls, you can consider making any of the following with it:
Step By Step Recipe
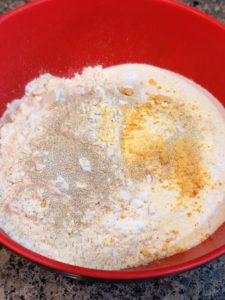
- Take wheat flour, salt, dried yeast, sugar, and garlic powder in a big bowl and whisk nicely.
- Add honey in lukewarm water. Knead above mix with it. Add oil.
- Knead for 8 to 10 minutes till the dough gets smooth and shiny.
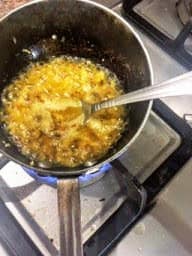
- In the meantime, prepare Garlic Oil. Heat olive oil, saute garlic and herbs in it for 30 seconds or so.
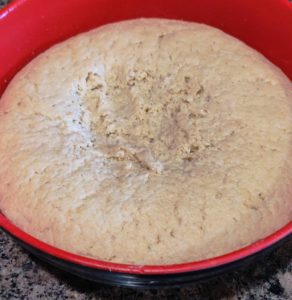
- Cover and proof it for an hour or till double in volume. As shown below.
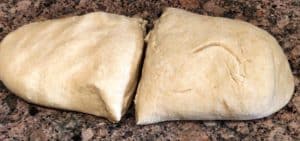
- Divide it into 2 parts.
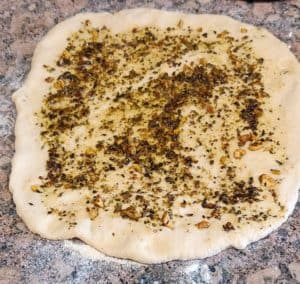
- Sprinkle flour on the working surface and roll one part.
- Spread garlic oil with herbs on it. Keep the other part covered till further use.
- Roll it.
- Cut Roundels.
- Flatten each roundel with palm, opening the layers at the same time.
- Keep the roundels in a greased baking tray.
- Cover with a cloth and leave for 20 to 25 minutes for second proofing. Before baking brush milk on these.
- Bake in a preheated oven for 20 to 25 minutes or till golden brown.

- Keep them on a wire rack. Brush butter. Cover with a damp cloth till completely cool.
FAQs
Q) How to replace instant yeast with dry yeast?
- To replace instant yeast with active dry yeast, use 2/3 tsp.
- As 1 TSP INSTANT YEAST = 1.25 TSP ACTIVE DRY YEAST.
Q) Can I make ahead these?
You can make these Garlic Rolls and store them in the refrigerator for 2 to 3 days. Just warm them up in the microwave/air fryer and they are good to be served.
New To Bread Baking?
If you are new to bread baking and not confident of using yeast then I would advise you to go through the following 2 posts as it will take away all your fears and give you confidence. ALL ABOUT THE YEAST and BASIC STEPS IN BREAD BAKING
However, if you are friendly with yeast then forget the above posts and dive straight into this recipe.
And still, if you are not comfortable in using yeast then try these easy PIZZA MUFFINS. These muffins are made without yeast and the best thing is that very little cheese is used in this. A perfect healthy option to have in the breakfast. Try it!
Let's Connect!
I hope you have liked these easy Garlic Buns recipe and will surely try it out for your loved ones. I will be happy if you share your creations on Instagram and tag me #samirasrecipediary there.
Thank you for reading this post. If you have liked this recipe then do let me know by leaving a comment below. Your feedback fuels my enthusiasm. You may share this post with your dear ones by clicking on the little buttons below. You may follow me on Facebook Pinterest Quora too. for latest recipe updates. Thank you!
Easy Garlic Buns Recipe
My Cup Measures 240 ml
For The Dough
- 1.5 Cups Whole Wheat Flour (Atta)
- 1/2 Cup Semolina, Fine
- 3/4 Teaspoon Salt
- 3/4 Teaspoon Honey/Brown Sugar
- 1/2 Teaspoon Instant Yeast
- 1 Teaspoon Garlic Powder (Optional)
- 1 Cup Lukewarm Water
- 1 Tablespoon Oil
Filling
- 2 Tablespoon Oil
- 1 Teaspoon Minced Garlic
- 1/2 Teaspoon Oregano
- 1/2 Teaspoon Mixed Herbs (Optional)
- 1/2 Teaspoon Basil, Dried (1 teaspoon if using Fresh)
- 1/2 Teaspoon Parsley, Dried (1 teaspoon if using Fresh)
For Topping
- 1 Tablespoon Milk, For Brushing Before Baking
- 1 Tablespoon Butter, For Brushing After Baking
For The Dough
Take whole wheat flour, salt, dried yeast, sugar and garlic powder in a big bowl and whisk nicely.
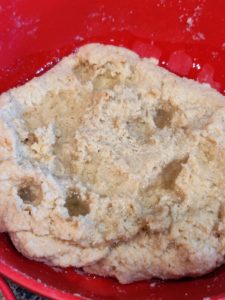
Knead it using lukewarm water. Having lukewarm water is very important. It should be such wherein you can put your fingers comfortably.
Too hot water will kill the yeast and if not warm then yeast will not activate.Add oil and continue kneading.
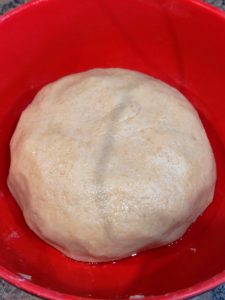
Put the dough on your kitchen counter and knead for another 4 to 5 minutes. Stretch the dough using the heel of your hands, fold it, then again stretch. Soon the dough will be smooth and shiny.
Grease the bowl liberally, put the dough in it, invert the dough so that the top also gets oily. Cover it with a plate or lid and let it rise for an hour or so till doubles in volume. Time is just a rough guide and will depend on the weather. If too cold then it may take even longer. So, instead of time, watch your dough.
While the dough is proofing, prepare the filling.
For Filling, heat oil in a pan, saute minced garlic and all the herbs for 30 seconds or so. Use when completely cool.
When the dough has risen, punch it to release the gases. Knead it lightly for few seconds.
Divide the dough in 2 equal parts. Keep one part covered and work with the other part.
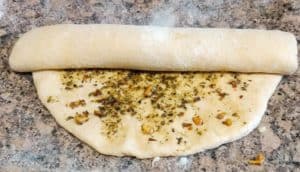
Sprinkle dry flour on the kitchen platform and roll the dough using a rolling pin. Keep the dough 1/4'' thick. Ensure that you are able to lift the dough easily without sticking or tearing.
Spread a layer of filling on this rolled dough.
Roll it. Seal the edges with the pinching motion. For this, wet your hands and then do it. This will making it easy.
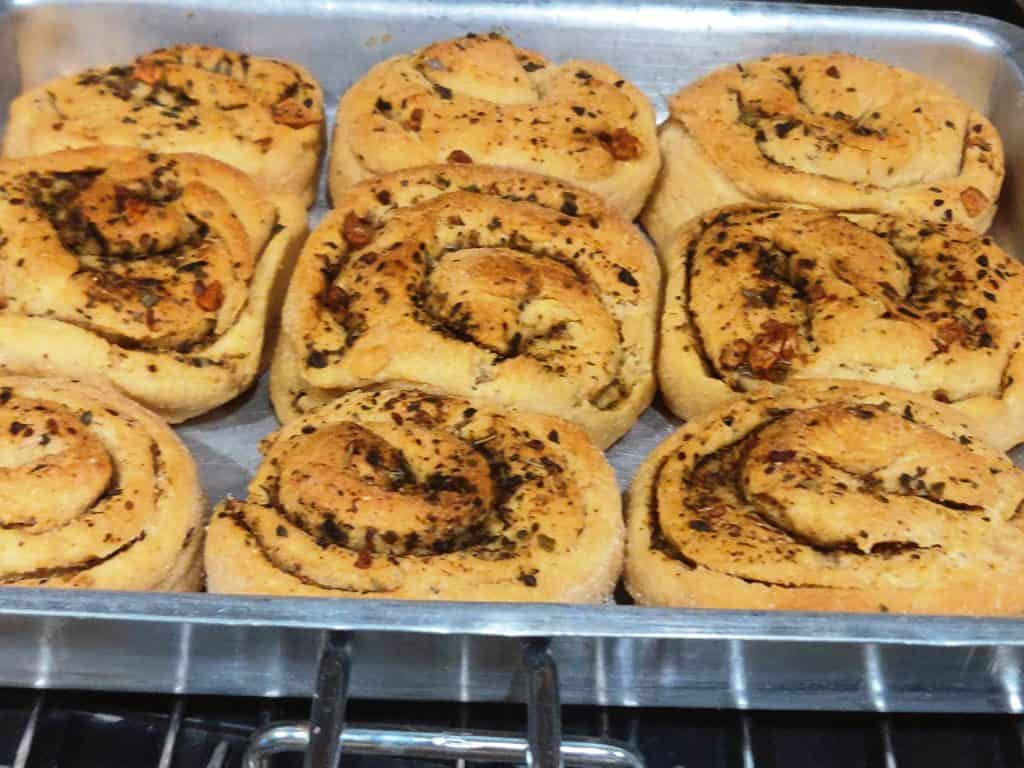
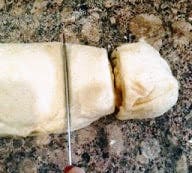
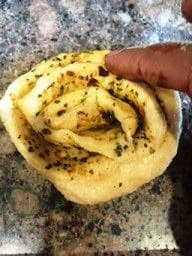
Using a pizza cutter/knife, cut roundels. Slightly press the discs with your palm so that they flattens up a bit.
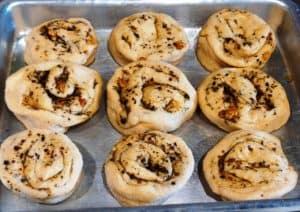
Keep the roundels in a greased baking tray. Leave a little gap between rolls.
Cover it with a kitchen napkin and leave it for 20 to 25 minutes for second proofing. During this time, rolls will further double up in volume.
After 15 minutes, start preheating the oven at 190 degrees for 10 minutes.
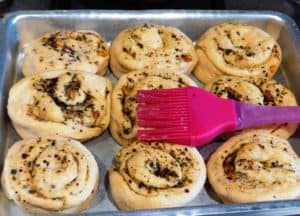
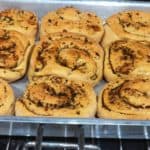
Brush the rolls with milk and bake for 20 to 25 minutes or till the rolls are golden brown. Keep the baking tray in the middle rack.
For the initial 15 minutes, bake with only the bottom rod on. After 15 minutes, use both the rods so that the top gets beautiful golden colour.
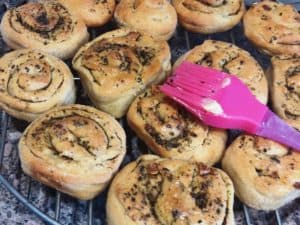
After taking out of the oven, keep the rolls on a wire rack.
Brush the rolls with butter, this will give a shine to the rolls.
If not serving immediately then cover these with moist cloth. Covering with dampened cloth will keep the rolls soft.
Once completely cool, keep them in an airtight container.
Serve with love, mayonnaise/hummus optional.
- Use warm water only for kneading otherwise the yeast will not activate and consequently, your dough will not rise.
- To replace instant yeast with active dry yeast, use 2/3 tsp. As 1 TSP INSTANT YEAST = 1.25 TSP ACTIVE DRY YEAST.
- You can use the same quantity of sugar in place of honey.
- Rising time depends on the quantity of yeast and on the weather conditions. During summers it may rise in 45 minutes to 1 hour. Whereas in winters it may take even up to 2 hours.
- When dividing the dough into 3 or 4 parts, it’s better to roll a log and cut with a pizza cutter. Do not tear it with your hands as it may destroy the gluten developed during rising. If you want to use just half the dough, then after deflating and dividing, pack the remaining half in cling film, place it in an airtight container and keep it in the refrigerator for up to 24 hours.
- The rolls rise during the rising time as well as during baking, so it is necessary to keep a substantial gap between the two otherwise they may stick to each other.
Stay Safe… Stay Happy
Is that 190 Celsius or Fahrenheit…? Sorry if this is a stupid question, but I don’t have a lot of experience baking bread. But 190 seems really low for Fahrenheit.
Dear,it’s Celsius. And it’s not at all a stupid question.And yes, you are right, it is too low for Fahrenheit.
If you are using active dry yeast instead of instant yeast, do you need to activate it in the water separately before adding it to the dry ingredients or can you just add it to the dry ingredients and mix before adding water?
Active dry Yeast has to be activated in lukewarm water, once the water gets frothy only then it is added to the flour. It cannot be added directly to the flour
Hi Samira! Thanks for all your fabulous recipes! I tried garlic roll today. The taste was good, but the rolls weren’t soft, almost crispy. Any advice on how to get soft rolls?
You are welcome Sharmi and thanks to you too for liking my recipes.
In all the possible reasons for the crisp rolls yeast is the top most. Did your dough rise well? Did they rise while second proofing too? If yes, then the only left out reason is that these were over baked. Hope this helps. If still you have any doubt then pl let me know, we both will work it out together. Happy Baking.
Thanks for your reply. My 1st proofing was good, the dough doubled. The 2nd proofing was not bad, waited for 20 min. I may have overbaked. After preheating, For the 1st 15 min, I baked with only bottom rod on, n next 15 min, with both rods on.
Will the addition of semolina made the dough a little hard?. In your recipe, you didn’t mention about when to add it!
Semolina makes soft and gives wonderful results. Add it along with wheat flour only. Thanks for pointing it out. Correction done now😊
That’s perfectly fine. It seems you need to reduce the baking time by 5 to 7 minutes, that’s all.