Bread is like a synonym for breakfast. There may be n number of choices to have in breakfast but bread tops the list since a long time now. I am sure you will agree with me.
There is hardly any house where you will not find bread and our house is no exception. My husband loves bread and butter toast is his favorite breakfast. Whatever is there in breakfast but it gets completed only after having at least one slice of bread.
With such a craze for bread, making homemade bread was obvious for me. I tried and after umpteen trials, I finally got success. Today, bread baking is as easy as making chapati only but the journey has not been easy at all.
Ever since I have started baking bread at home, there is no looking back. Homemade Bread is just out of the world. Nothing to beat the taste and aroma of homemade bread. Once you start making bread at home, no one in your family will like store-bought bread.
Though all varieties of bread are good having their respective taste and aroma but what about our age-old, traditional white sandwich bread. We have grown eating that bread only so how can we forget it so easily.
Once you have baked white sandwich bread then, of course, you can use it for multiple purposes. Some of the recipes I would recommend using this homemade sandwich bread are:
Using the same dough, you can make Ladi Pav or Pav Bunsas well. Everything remains the same except the shaping, A must try!
White Sandwich Bread for Beginners
And for beginners, it's good to try their hands first on this easy white bread recipe and once confident, should move slowly and gradually to whole wheat bread.
Before I move to the recipe, I want to share something with you all. Bread making is an art. An art that can be mastered only through practice and with proper understanding.
New To Bread Baking?
If you are new to bread making or have some inhibitions in using yeast, then my suggestion is that you first go through the basics by reading ALL ABOUT YEAST and BASICS OF BREAD MAKING.
However, if you are friendly with yeast then forget the above posts and dive straight into the recipe below.
Important
Once you have knowledge about yeast and the basics of bread making, making bread is really easy and simple but yes, I repeat it requires a lot of practice. If it's your first time then it would be really helpful to you if you go through the above-mentioned posts.
As long as your dough rises well, continue making bread. Do not worry much about the shape. Sooner or later shape will also fall into place.
Also, bread making is a lengthy process, one needs to go through a series of steps. You need to have patience for this. Though actual time spent may be less but proofing time (resting time) is more. So prepare yourself first, then proceed.
Step By Step Recipe
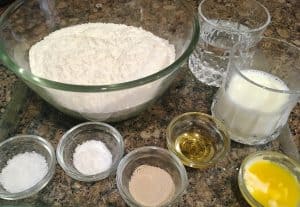
A. Gather Ingredients
- Collect all the ingredients, refined flour, yeast, sugar/honey, salt, milk, lukewarm water, oil and butter.
B. Proof (Activate) Yeast
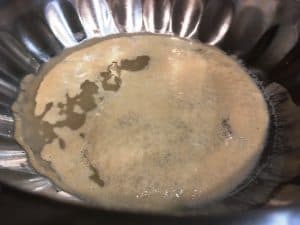
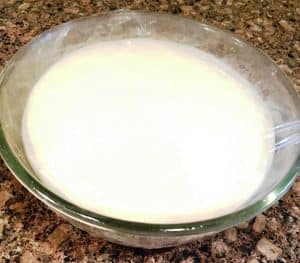
- First of all, take a big bowl and pour lukewarm water in it. Water should be lukewarm, in which you can dip your finger comfortably. Too hot water will kill the yeast and if not warm then the yeast will not activate.
- Add honey/brown sugar and yeast. Stir it very lightly. Cover it and let it stand for 10-15 minutes till it becomes frothy and bubbles appear. Sugar is the yeast of food, feeding on which it grows. Add any type of sugar you are comfortable with.

- While the yeast is getting ready, you also get ready with your preparations.
- Sift flour and salt.
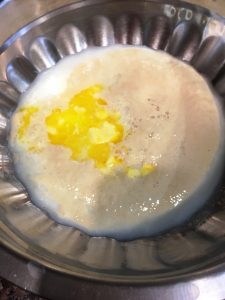
- Once the yeast is proofed, add milk and butter in it.
C. Knead Flour
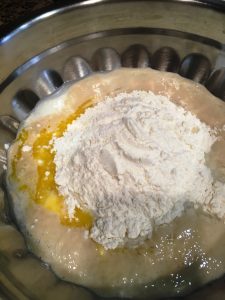
- Start adding flour. Add flour in 3-4 batches. Add 1 cup flour, mix it with the yeast solution. Then another cup of flour, mix it, and finally the remaining flour.
- Mix it nicely. It will be very sticky at this stage. Some people use silicone/plastic scraper to manage the dough. I prefer doing it by hand only.

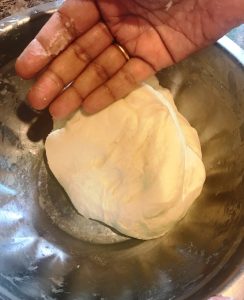
- Gather the dough and toss it between your hands (like a ball) After 8-10 tosses, it will become manageable and will stop sticking to your hands.
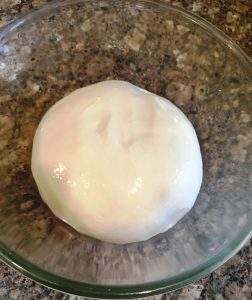
- Now sprinkle a little flour on the kitchen counter, put the dough on it and start kneading using both your hands. Keep scraping in between. After few minutes, the dough will be smooth and shiny.
- Do the test for kneading. If poked a finger in the dough then it should bounce back.

- Grease a bowl, put the dough in it. Flip it so that both sides of the dough are properly greased.
- Cover the bowl with a plastic sheet/damp cloth/lid.
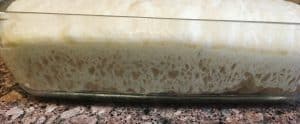
- Keep the covered bowl in some warm place for an hour or so, till it gets doubled. Keep an eye on the dough and not on the clock as time may vary. I winters it may take up to 2 hours also.
- In winter, it is better to keep it inside your Otg or microwave oven, just switch on the light of these appliances also.
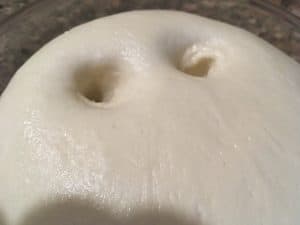
- Once the dough is double, do the ripe test. Insert two fingers in the dough to see that the indentations remain and rebound slowly.
D. Knockdown The Dough
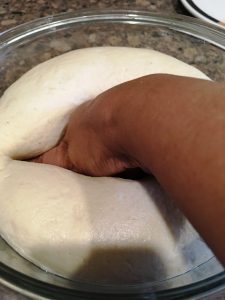
- Now, deflate or knockdown or punch down the dough using your fist. Knead it lightly for a minute or so.
E. Shaping The Loaf
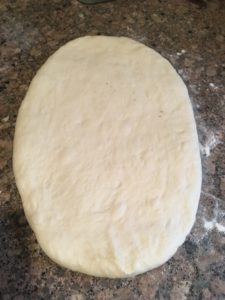
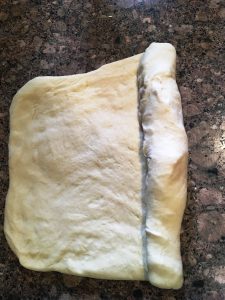
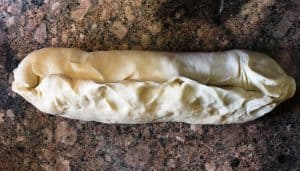
- Sprinkle some dry flour on the kitchen counter, put the dough and spread it roughly into a rectangle using a rolling pin. Keep the width more or less equal to your loaf's length. Start rolling it from one end and shape it like a log. Seam the edges either using the side of your palm or doing the pinching motion. This is a very important step, so do it very carefully. If not satisfied then again spread it and repeat the process.

F. Final Proofing
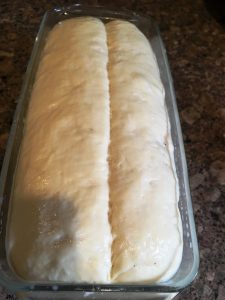
- Take the loaf tin of size 9" by 4" by 4". Grease it, not just the bottom but sides too up to the top, as the bread will rise above the rim.
- Keep the shaped dough into this loaf tin, taking care that the seam side goes into the bottom.
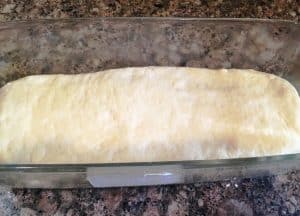
- Cover the loaf tin with a damp cloth and again leave it for 20 to 25 minutes or till the dough rises up to the rim of the loaf tin.
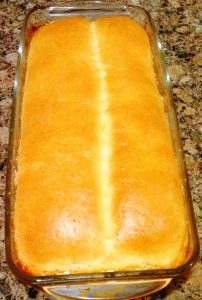
- After 40 minutes or about 10 minutes prior to baking, preheat the oven to 190 degrees Celsius for 15 minutes.
- Slash the dough with a serrated knife and milk wash it. Slashing is done so that hot air is escaped through it and the bread does not tear while baking.

- For Milk wash: Take 1 tsp milk in a bowl, using a brush wipe the loaf with this milk.
- Bake for 40 to 45 minutes. Normally by now, the top gets golden and your house is filled with the aroma of freshly baked bread.
- Sorry, no skewer test for bread. To check whether it is done or not, tap on the top if it sounds hollow then done otherwise bake for some more time.
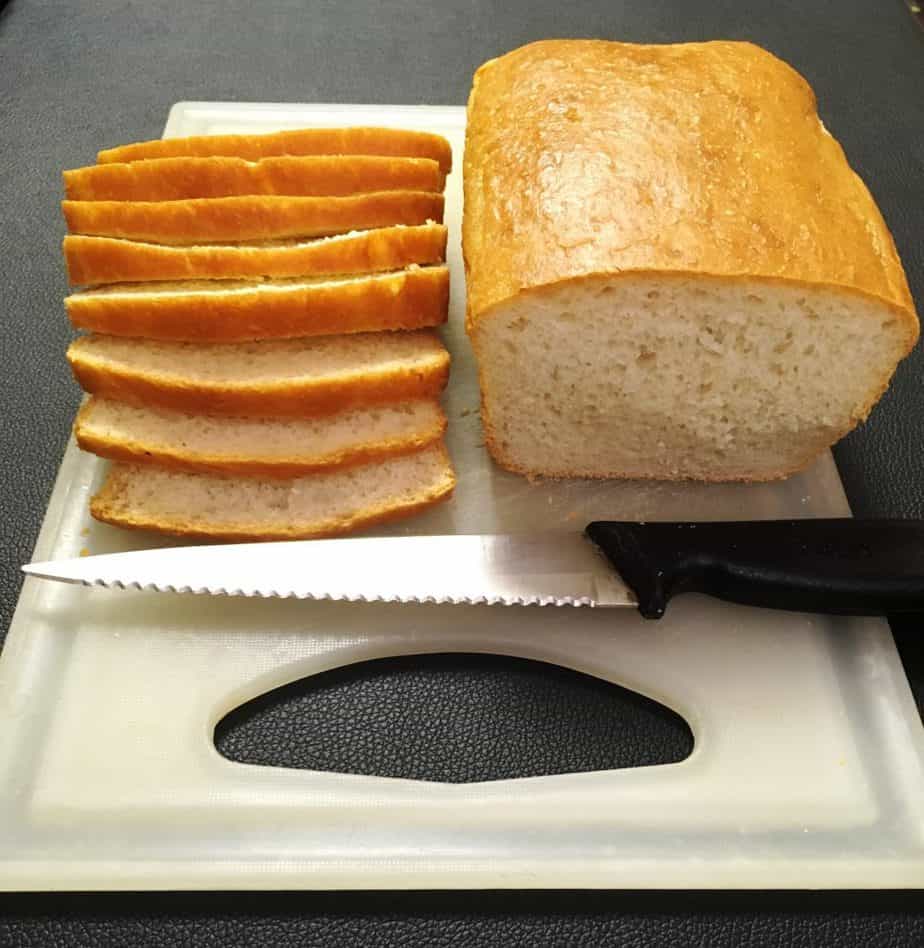
- Take it out of the oven, leave it for 4-5 minutes. Loosen the sides using a butter knife and invert it onto a wire rack.
- Brush butter on the top.
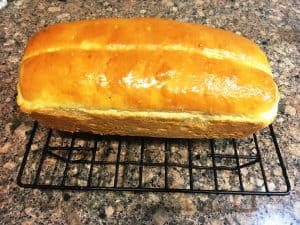
- Cover with a damp cloth and let it cool down. This is important as it makes the bread crust soft.
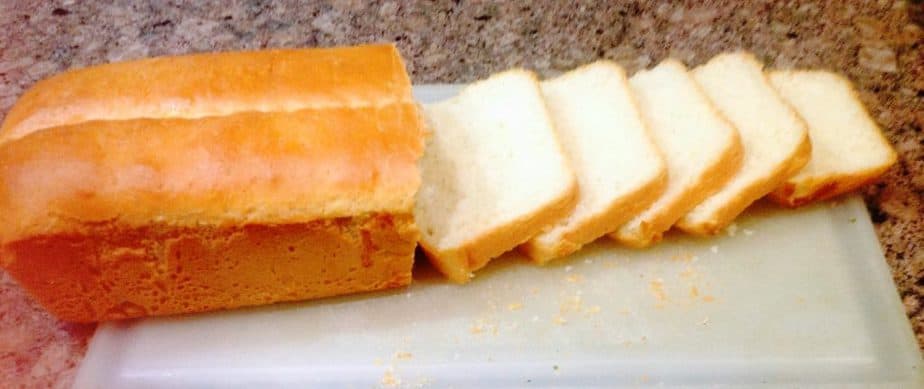
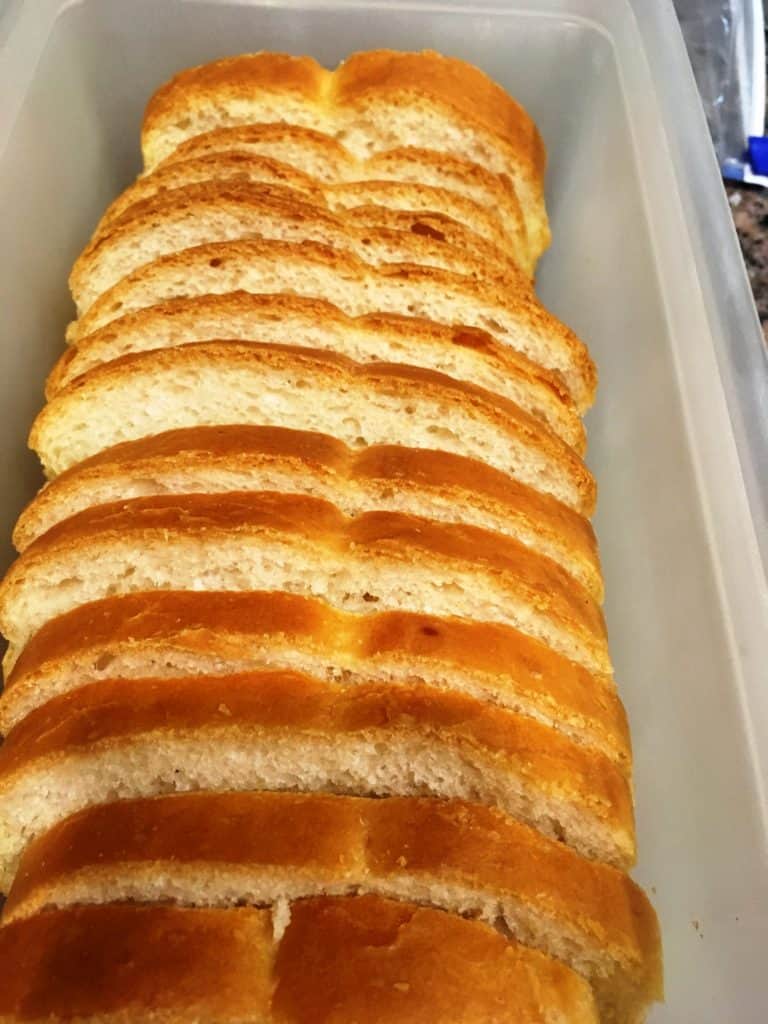
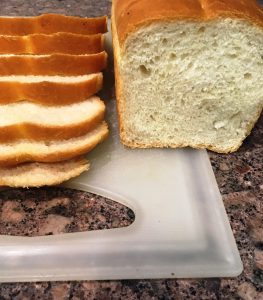
- Once cooled completely, cut slices and enjoy.
- Since no preservatives are used, it remains good for a day or two only at room temperature.
- So, pack it in ziplock bags and keep it in the refrigerator.

FAQs
Q) How to bake it in Otg?
- I do most of my baking in microwave convection. This bread too was baked in microwave convection.
- However, to bake in an OTG, do as follows or refer my Ladi Pav recipe where I baked the Pav Buns in an OTG.
- Preheat the oven at 200 degrees for 15 minutes using the bake mode or turning on both the rods.
- Once preheated, switch off the top rod. keep the bread tin on the middle rack and bake for 35 to 40 minutes.
- In the last 15 minutes, switch on the top rod too so that the top of the bread gets a beautiful golden colour.
Q) Can I replace refined flour with whole wheat flour?
- If you are looking for a healthy white sandwich recipe and do not want to use refined flour then replace the refined flour with whole wheat flour.
- In that case, everything remains the same except for the quantity of liquid. You will be needing one and three-quarter cups of liquid, so, increase the quantity of either milk or water.
Related Recipes
If looking for flatbreads without yeast then you must try any of the following:
However, if you have a sweet tooth, then do try these sweet loaves of bread made with orange marmalade and Nutella: ORANGE BABKA BREAD or CHOCOLATE BRAIDED BREAD
Let's Connect!
I hope you have liked this recipe of White Sandwich Bread then do try it out for your loved ones. I will be happy if you share your creations on Instagram and tag me #samirasrecipediary there.
Thank you for reading this post. If you have liked this recipe then do let me know by leaving a comment below. Your feedback fuels my enthusiasm. You may share this post with your dear ones by clicking on the little buttons below. You may follow me on Facebook Pinterest Quora too. for latest recipe updates. Thank you!
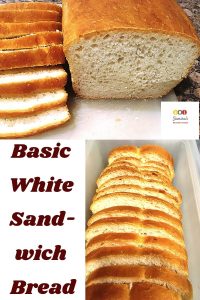
White Sandwich Bread
Easy and quick recipe to make your own basic white bread.
- 3.25 Cups (400 g) All-Purpose Flour plus 1 Tbsp for dusting
- 1.5 tsp Salt
- 3/4 Cup Lukewarm water
- 1 tsp Instant Yeast
- 1.5 tsp Sugar
- 1/2 Cup Milk, at room temperature plus 1 tsp for Milk Wash
- 1 Tbsp Butter, softened plus 1 tsp for Brushing
- 1 tsp Oil
- Proof yeast: First of all, take a big bowl and pour lukewarm water in it. Add sugar and yeast. Stir it very lightly. Cover it and let it stand for 10-15 minutes till it becomes frothy and bubbles appear.
- While the yeast is getting ready, you also get ready with your preparations.
- Sift flour and salt.
- Once the yeast is proofed, add milk and butter in it.
- Start adding flour. Add flour in 3-4 instalments. Add 1 cup flour, mix it with the yeast solution. Then another cup of flour, mix it and finally the remaining flour.
- Mix it nicely. It will be very sticky at this stage. Some people use silicon/plastic scraper to manage the dough. I prefer doing it by hand only.
- Gather the dough and toss it between your hands ( like a ball) After 8-10 tosses, it will become manageable and will stop sticking to your hands.
- Now sprinkle a little flour on the kitchen counter, put the dough on it and start kneading using both your hands. Keep scraping in between. After few minutes, the dough will be smooth and shiny.
- Do the test for kneading. If poked a finger in the dough then it should bounce back.
- Grease a bowl, put the dough in it. Flip it so that both the sides of the dough are properly greased.
- Cover the bowl with plastic sheet/damp cloth/lid.
- Keep the covered bowl in some warm place for an hour or so, till it gets doubled.
- It is better to keep it inside your Otg or microwave oven. In winters, just switch on the light of these appliances also.
- Once the dough is double, do the ripe test. Insert two fingers in the dough to see that the indentations remain and rebound slowly.
-
Knock/punch down: Now, deflate or knockdown or punch down the dough using your fist. Knead it lightly for a minute or so.
- Shaping the loaf: Sprinkle some dry flour on the kitchen counter, put the dough and spread it roughly into a rectangle using a rolling pin. Keep the width more or less equal to your loaf's length. Start rolling it from one end and shape it like a log. Seam the edges either using the side of your palm or doing the pinching motion. This is a very important step, so do it very carefully. If not satisfied then again spread it and repeat the process.
- Take the loaf tin of size 9" by 4" by 4". Grease it, not just the bottom but sides too up to the top, as bread will rise above the rim.
- Keep the shaped dough into this loaf tin, taking care that the seam side goes into the bottom.
- Final Proofing: Cover the loaf tin with a damp cloth and again leave it for 40-45 minutes or till the dough rises up to the rim of the loaf tin.
-
After 40 minutes or about 10 minutes prior to baking, preheat oven to 190 degrees Celsius for 15 minutes. I bake in microwave convection using the convection mode. To bake in an Otg, read the instructions given in the post.
- Slash the dough with a serrated knife and milk wash it.
- For Milk wash: Take 1 tsp milk in a bowl, using a brush wipe the loaf with this milk.
- Bake for 40 to 45 minutes. Normally by now, the top gets golden and your house is filled with the aroma of freshly baked bread.
- Sorry, no skewer test for bread. Take it out of the oven, leave it for 4-5 minutes. Loosen the sides using a butter knife and invert it onto a wire rack.
- Brush butter on the top.
- Cover with a damp cloth and let it cool down.
- Once cooled completely, cut slices and enjoy.
- Since no preservatives are used, it remains good for a day or two only at room temperature.
- So, pack it in ziplock bags and keep in the refrigerator.
- The amount of liquid used may be slightly more or less (by 1 tbsp) depending on the flour.
- If using dry yeast instead of instant yeast then take 1.25 tsp dry yeast.
- Sifting is done for two reasons, one is to aerate the flour and other is to mix the salt in the flour. This is because yeast does not like salt and if put on salt its growth may be inhibited.
- Ensure that the dough is greased from both the sides so that cracks may not appear in it while proofing.
- Baking time may vary slightly from oven to oven so keep a watch 3o minute onwards.
- In case the top gets too much brown then cover it with aluminium foil.
- To check for the doneness of the bread tap on the top of the bread, If sounds hollow then it means it is done.
- After taking out of the loaf tin, always keep the loaf on a wire rack otherwise it will turn soggy from the bottom and also cover it with a damp cloth till cools down completely.
- Always cut the bread into slices when it is cooled completely.
- Butter is brushed on the top to give a shine to the loaf.
This was originally published on 25th July 2017, republished on 13th July 2020
I made this with whole wheat and also with oats…this lockdown, I am totally besotted with bread-making. For oats, I just added half cup oats to the dough after soaking them in boiling hot water…your recipes are very good…
Nice and healthy twist! Thanks for your kind words.
I tried this this it turned out awesome…… Everyone at my place loved it…..Thanks for this amazing recipe……
I am glad you all like it. Thank you so much dear for trying it out and sharing your wonderful feedback.