Welcome to the world of Homemade Bread! Basic Steps Involved In How To Make Bread at home, will take you on a short yet crisp tour into the amazing world of baking bread.
Once you understand these basic steps then making bread is just a matter of practice. You do not need any recipe to make bread (except in the initial stages) and it will easily come to you on its own just like you started making chapatis.
Remember, bread making is an art. You master this art, like any other art, only with practice. But for practice, you need to undergo theory lessons first.


Must Read: All about Yeast
Basic Steps in Bread Making
Homemade bread is addictive. Its taste, its aroma is simply intoxicating. Once you taste the freshly baked homemade bread, you will never have the store-bought one.
How to bake bread at home involves a series of steps. Initially, it may seem somewhat confusing but after 2-3 bakes only you will get into it.
Trust me, the more you will bake the better it will get. You will see that each subsequent loaf is better than the previous one. And it is so simple that after a few bakes only you will start doing it your way.
Making bread at home is simple! There are only 4 ingredients to make bread- flour, yeast, water and sugar but... it requires lots n lots n lots of practice. Perfection will come with practice only. Just like swimming or driving or making perfect round chapati. The more you do the better it becomes. Go thoroughly through your lessons, understand the steps involved, learn to read your bread dough through your eyes also rather than just going by time, follow the recipe and very soon you will start making bread, your way....no recipe, no clock, no measurements.
So, before we proceed, ease out yourself, grab a cup of hot coffee and join me in this journey. There is no recipe in this post, all it wants is your attention. Go through this post in a relaxed manner, if need be read it twice or maybe thrice to get a hang of the topics and terms involved in it.
Flow Chart of Bread Making Process
Proofing Yeast
↓
Kneading Dough
↓
First Proofing/ Rise
↓
Knockdown
↓
Shaping
↓
Second/Final Rise
↓
Milk Wash & Slashing
↓
Baking
↓
Cooling Completely
↓
Slicing
↓
Enjoying Your Homemade Bread With A Broad Smile
Now, let us understand each and every term specifically and in detail.
Proofing Yeast
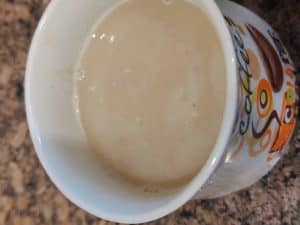
In very simple words, Proofing yeast means activating the yeast. It is done by adding yeast to warm water along with sugar. After 10 to 15 minutes (even longer in cold weather), yeast swells or blooms, and this water becomes frothy and bubbly.
Ensure that the water you are using to proof yeast is warm.
Hot water kills yeast and even in less warm water yeast does not activate. Some people use a thermometer to gauge temperature but everyone doesn't have it. Even I don't have it. So to check whether the water is sufficiently warm or not, just dip your finger in it. As long as it feels warm and comfortable to you, it will be warm and comfortable for the yeast too. (Another test is if asked to take bath with it, will it be okay for you?)
Why Sugar Is Added For Proofing Yeast?
- Sugar is yeast's food. So, sugar is added (or honey or maple syrup) just enough to give the yeast a reason to wake up and eat.
- Cover it with a lid/plate and leave it for at least 15 minutes.
- During this time the yeast will eat up sugar and emit carbon dioxide. Hence the water will become frothy and you will also see some bubbles in it.
- Time may vary according to weather, therefore keep an eye on it. It might take up to 20 or 25 minutes. So, wait for it to become frothy.
- This shows that the yeast is good and also that it is ready to make bread with it.
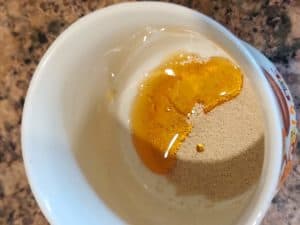
Yeast and Honey in a Cup
Add Lukewarm Water

Yeast Activated
- If it does not swell and the water does not become frothy, it means that the yeast has either expired or is not of good quality. In that case, discard it and start afresh after getting a new yeast.
- Thus it is a way to prove that the yeast is good enough to be used and hence the name was given Proofing Yeast.
- Normally, only dry active yeast is proofed. But it is better to proof instant yeast also as it ensures that the yeast is good. Otherwise, if by chance, your yeast has expired/not of good quality then you will come to know only when your bread doesn't rise. Your efforts will be wasted and you will keep blaming the recipe or your own self. Therefore it is better to proof yeast, whether dry or instant, both.
- To know about yeast, what it is and what are the types of yeast, click here.
Kneading The Bread Dough
Though nowadays we have no-knead bread also but that depends on the recipe. If the recipe asks for kneading the dough then you have to.
Why do we knead the bread dough?
Well, kneading is essential to strengthen the gluten.
And what is Gluten?
- Gluten refers to the stringy bands of proteins that give bread its structure and texture. As we knead the dough, either manually or in a stand mixer, those strands of gluten are tightened up and get into line.
- Knead the dough for 12-15 minutes by hand or 8-10 minutes in a mixer.
How to knead the bread dough?
Once you mix everything and start kneading, then initially it is very tough. The dough is very heavy and sticks badly to your hands.
When you start kneading the dough it is like a wild animal totally out of control. But don't worry it's just a matter of a few minutes. You simply keep kneading it, preferably on the kitchen counter as then you can use both your hands. Knead it using the stretch and fold method (like that of washing clothes by hand). You may lightly grease your hands in between. Soon you will be amazed to see your clean hands and also that how easily you can handle the dough the way you want. Now it is like your tamed animal, who will obey your command. Roll this dough in your bowl (with flour stricken all over) and once again you will feel happy to see your clean bowl.
My tip: After mixing everything, cover it and just leave it for 6-7 minutes. As they say, time is a big healer, the same way time plays its role here and the dough becomes manageable. Then I gather it roughly into a ball and just flip it between my hands, from one hand to the other and after 8 to 10 flipping it stops sticking, then I put it on the counter/food processor for kneading.
I don't have a stand mixer but, I sometimes knead it in my food processor using the kneading blade (the one of plastic). Results are beautiful with less labor. So, you may knead it by hand for 15 to 20 minutes or in the food processor for 5 minutes.
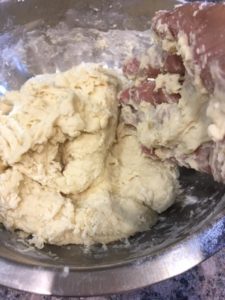
When Start Kneading
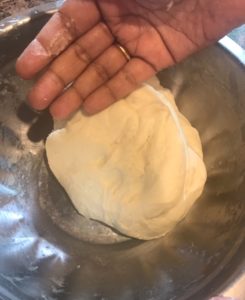
After 15 minutes of Kneading
How Do You Know That The Bread Dough Is Kneaded Enough?
Look for the following indications to check whether or not your dough has been sufficiently kneaded...
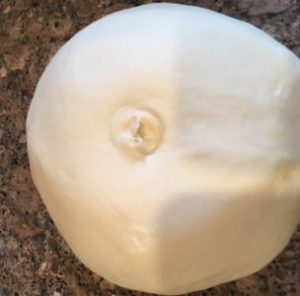
- Smooth Dough: First of all, the dough will now look smooth and shiny.
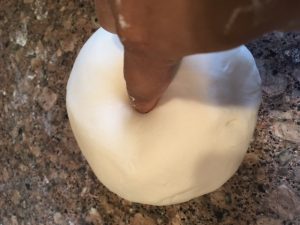
- Poke test: The simplest way to know that you have kneaded enough is to poke your finger in the dough. When taken out, the dough will immediately bounce back.
- Hold its shape: The dough should form a ball without sagging. It means that when you lift the ball of dough in your hand and hold it in the air for a second then if it holds its ball shape then the gluten is tight and strong. If it is sagging sideways between your fingers then knead for some more time.
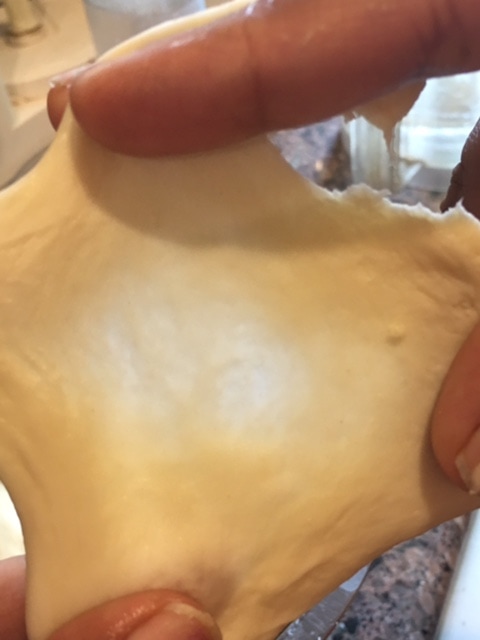
- Windowpane test: The third one is the windowpane test. For this take a little dough in your hand. Folding it with both hands stretch it slowly into a thin sheet. Without tearing if it stretches so much that light passes through it then the dough is sufficiently kneaded. If it tears, then continue kneading. It requires practice so don't be upset if you cannot perform this test initially.
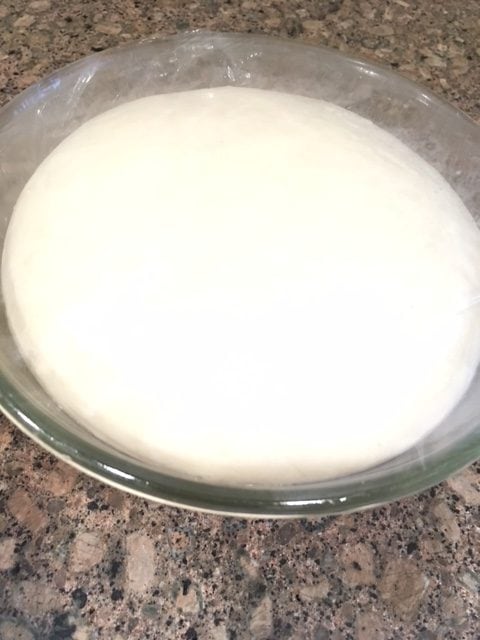
- Once you are satisfied that the dough is sufficiently kneaded then take a bowl. Grease it with oil. Now put the dough in it and flip the dough so that it is greased from both sides. If the dough remains dry, it may develop cracks. This is important or else the dough may dry up and form cracks while rising. Cover the bowl with cling film or plate or damp cloth.

First Rise
- Now after so much exercise, the dough needs to take a rest. It is left undisturbed for an hour or so and it is called the rising time.
- The first Rise is also referred to as Proofing the dough. Proofing means resting the dough for an hour or so during which gases (carbon dioxide and ethanol) are released and makes the dough rise.
- For proofing, it is advised to keep the bowl of dough in a warm place. Ideal rise temperatures are between 80°F – 90°F; higher temperatures may kill the yeast and keep the dough from rising; lower temperatures will slow the yeast activity which will increase your rise time. The best place is to keep it inside your oven, yes closed oven. In winters you may just switch on the oven's light. The dough will rise beautifully just in the warmth of light.
- The dough will rise in how much time? Well, no fixed answer to this question. During summers it may rise in 45 minutes to 1 hour. Whereas in winters it may take even up to 2 hours. The rising of the dough depends on many other factors also like the recipe, room temperature, humidity, quantity of yeast used, etc.
- So timing is just a rough guide. Observe the dough as to when it becomes double in volume
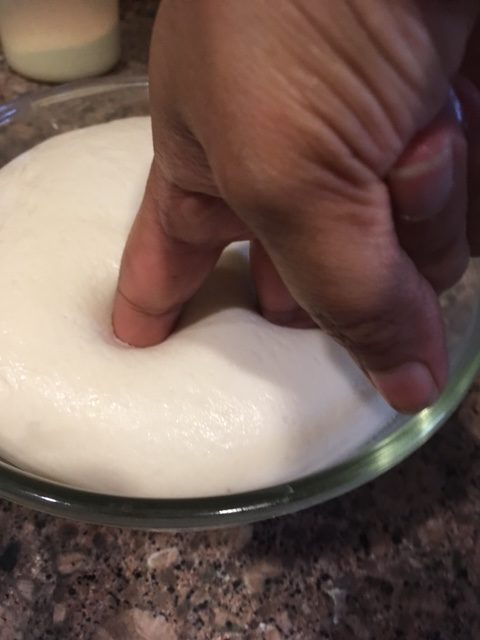
Q) How do you know that the Bread Dough has Risen Enough?
- The dough has risen enough when it becomes double in size. Also, perform the Ripe Test. The ripe test determines if the dough is ready to be punched down and shaped.
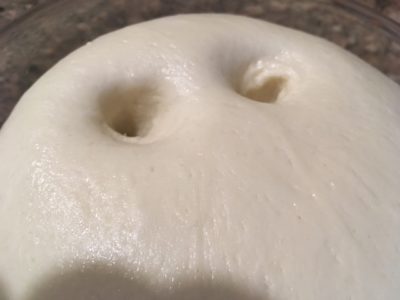
- To perform the Ripe Test, poke two fingers in the risen dough up to your second knuckle.
- If proofed well, then you will see dents that will rebound slowly.
- If comes up too quickly, it means it needs more proofing.
- And if it does not rebound, it means the dough is over-proofed.
Q) What happens if the dough is over-proofed?
If the dough is over-proofed, the yeast runs out of readily available food and goes dormant or dies off. When that happens, you don't get a good rise the second time because the yeast is no longer eating and creating the CO2 that forms the bubbles in the bread.
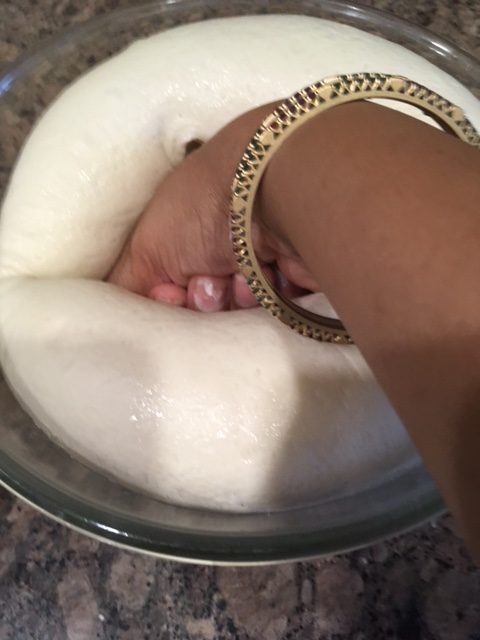
Knockdown
- Time to knock down the dough. The term knockdown/Punch down means to deflate the dough. Make a fist and press the risen dough with it. You will see that it has returned more or less equal to its previous size.
Q) Why do we deflate the dough?
- First is that the gluten which developed during kneading gets a chance to relax.
- The other reason is to release the alcohol built up during the first proofing. If it is not released then it creates a toxic environment that subsequently kills the yeast.
- After the knockdown, knead it just for a minute or so, that too very mildly.
- Now is the time to shape up. Be gentle with the dough and shape it according to the type of bread you are going to bake. If you are too harsh with the dough then you may destroy the gluten developed therein.
- But wait... after shaping it do not put it in the oven. It's time for a second rise or final proofing.

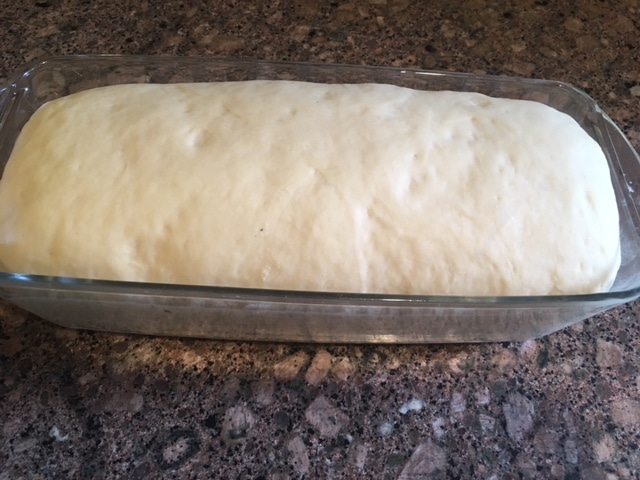
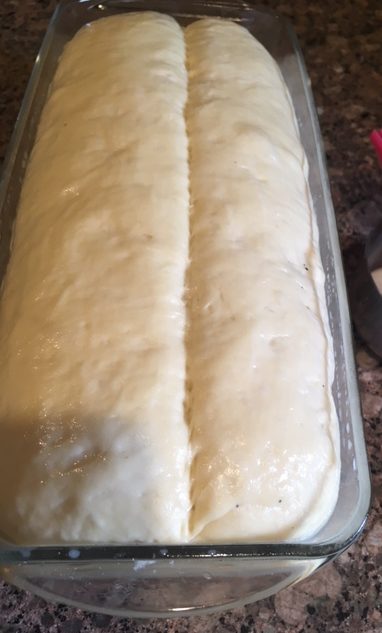
Final Proofing (Second Rise)
- Final proofing takes place in the shape you want to see your bread in. If making loaf then after shaping keep it in the loaf tin. Don't forget to grease the loaf tin before keeping the loaf in it.
- The second rising, or proofing, gives a better volume, a more mellow yeast flavor, and a finer texture to the bread.
- Again, cover it with a damp cloth/cling film/lid and leave it to rise in some warm place for half an hour to 45 minutes or as the recipe says.
- Keep observing the dough and after around 30-35 minutes, start preheating your oven.
- To determine if a risen loaf is ready for the oven, lightly touch the side of the loaf; if the imprint remains, it is ready to be baked. Expect a beautiful oven spring!
Slashing
- You must have seen beautiful patterns on some pieces of bread like on baguettes or boule or even on Domino's Garlic bread. Are these really patterns to beautify the bread? Well, these cuts are called Slashing in the baking world.
- Slashing the dough before baking does more than just make a pretty pattern on your bread. It also helps direct how the bread will rise in the oven. Have you ever baked a loaf of bread and ended up with a large air pocket right under the crust? Well, slashing your loaf helps prevent this.
- For a sandwich loaf, one long slash down the center of the loaf is a nice finishing touch. Prior to slashing, you can brush the dough with egg wash, water, milk, or egg white. Lastly, if you wish, you can add some poppy seeds, sesame seeds, etc. You can also leave the bread plain.
Baking
- You can bake bread either in microwave convection or Otg or in an air fryer or in a wok on the gas stove, but preheating is a must.
- To bake in the microwave, use the convection mode and preheat it. You do not need to make any other adjustments as everything is set automatically in convection mode.
- To bake in an Otg, use the BAKE mode. However, if it is not mentioned then preheat it with both the rods ON. Keep the baking tin in the middle tray and bake with only the lower rod ON (switch off the top rod now). In the last 15 minutes, switch ON the top rod also so that the top of the bread gets a beautiful golden color.
Brushing Butter and Cooling on Wire Rack
Once out of the tin, brush butter on the top and keep it on a wire rack till it cools down completely. Also, cover it with a damp cloth. Butter gives shine to the bread, the wire rack stops it from getting soggy from the bottom and the damp cloth makes the crust soft which is hard when out of the oven.
Slicing Bread
Please...slice it only when the bread is completely cooled down otherwise you will have more crumbs than slices.
Enjoy with Smile
- Yes, now is the time to reap the benefits of your labor. Eat it just like that (it tastes superb) or make sandwiches or use it the way you like. It can be stored in an airtight container or ziplock bag in the refrigerator for up to 4 to 5 days.
Once you go through these steps, then first try Garlic bread or Pizza or Chocolate Braided Bread, as these are the simplest ones and do not require a loaf tin.
Thereafter, as you gain confidence, you are the boss and try making Basic Sandwich Bread or Orange Marmalade Bread or Pizza Rolls or Garlic Rolls.
And, don't stress about your bread being perfect. Don't compare your loaf with the one you get in stores or you see in pics. As long as it tastes good, continue baking. One day, your loaf will be better than the ones shown in pics.
There's no point in baking at home if it doesn't bring you joy. If a part of the loaf burns, don’t worry. People like the crispy parts. If one part isn't as firm as the rest, that's cool. People like the soft parts. The ultimate thing to keep in mind is that if the bread is fresh and warm, people will pick it the second it hits the table.
Related Posts:
- Importance of Preheating
- Olive Oil Types and its Uses
- Difference Between Baking Soda and Baking Powder
I hope you have found this post on the basics of baking bread useful. I would love to have your views regarding this.
Thank you for reading this post explaining the basics of bread making. If you have liked this post then do let me know by leaving a comment below. Your feedback fuels my enthusiasm. You may share this post with your dear ones by clicking on the little buttons below. You may follow me on Facebook Pinterest Instagram(#samirasrecipediary) too. for the latest recipe updates. Thank you!
Happy Bread Making...
My heartfelt acknowledgments to the following links for the valuable inputs,
Agar without yeast banana hai toh kya option hai
Hi, aap sour dough se bana sakti hain. Isme hum aate aur pani se apna yeast tayyar karte hain.
Dear Samira , thank you so much for the valuable information. I must say i thoroughly enjoyed reading every bit.
I baked all purpose flour bread for the first time.. i followed the same process. It came out well.
But from inside ,it is not evenly baked and has some part unbaked as well. I preheated the oven for 5 minutes at 200deg C ( convection mode) and later baked for40 minutes at 180deg C. I stopped it before 5 minutes as the outer crust turned brown in color. Any suggestions in temperature change mam?
Hi Lathika… I an glad that you liked it and found it useful too.
It’s really commendable if you got your first loaf well.
But as you said, it remained unbaked from parts then this is purely due to temperature settibgs.
First of all. Preheat it for 10 to 12 minutes atleast or wait for the beep if its automatic. As in convection, we generally have beep system.
Do not reduce the temperature to 180. Keep it atleast 190.
If the outer crust gets brown then you can cover it with aluminium foil.
Bake for 40 minutes. You can’t do skewer test but before letting it cool completely tap at the bottom of the loaf. It should sound hollow. If not, then bake for few more minutes.
Later, keep the loaf on a wire rack, cover with a damo cloth and let it cool completely before slicing.
Happy baking once again…
Next time, if possible, share the pic too. Would love to see it🙂
Wow! Such wonderful post on bread making. Excellent tips for beginners like me who like baking but r afraid of trying something difficult
Thanks. Looking forward to more such osm articles
Thank you so much dear for your kind words.
Start your beautiful journey of baking breads. One thing would like to add that be patient and start with easy breads like pizza, garlic bread etc.
Happy Baking… Feel free to ask in case of any doubt.
Very well written considering all stages of bread making.
Some articles I have read on bread making suggest using room temperature water and not warm water. This is because they suggest a slow rise for enhanced flavor to bread.
What is your opinion about this?
First of all thanks dear for liking the article.
Coming to your query, warm water is must for activating yeast. It should be slightly warm wherein you can dip your finger easily for few seconds. It should not be hot. May be in peak summers you can use normal water but I have never used it. The best is that you do an experiment. Take 3 bowls, put equal quantity of yeast and sugar in all 3. Now put normal water in one, warm water in second and hot water in the third bowl and watch it. It will be clear to you.
For slow activation, we keep the dough in the refrigerator. Like if you keep it in the evening, it will be ready by the morning. Hope it is clear to you now.
Feel free to ask in case of any other doubts/ confusions.
Happy Baking…
Thanks for your appreciation. Do find time for reading more of what keeps coming on the site from time to time.
I enjoyed reading the recipe for bread making and I must tell you that you are a generous person to include every little detail that would determine the outcome of a perfect bread. Thank you so much. I am really inspired and excited to try my hand at this recipe. I have tried making bread earlier but wasn’t very happy with the result. The tips you shared will definitely come in handy.
Thank you so much dear for your kind words. I am sure you will be able to bake excellent breads. Feel free to contact in case of any doubt/confusion. Happy Bread making…